
In today’s dynamic software development landscape, rapid and reliable delivery is not a luxury; it’s a necessity. As applications become more complex and user expectations more demanding, organizations must adopt efficient DevOps release lifecycle practices to stay ahead. While CI/CD pipelines are often discussed in isolation, many teams struggle with one fundamental question:
“What exactly happens from the moment I commit code until it goes live in production?”
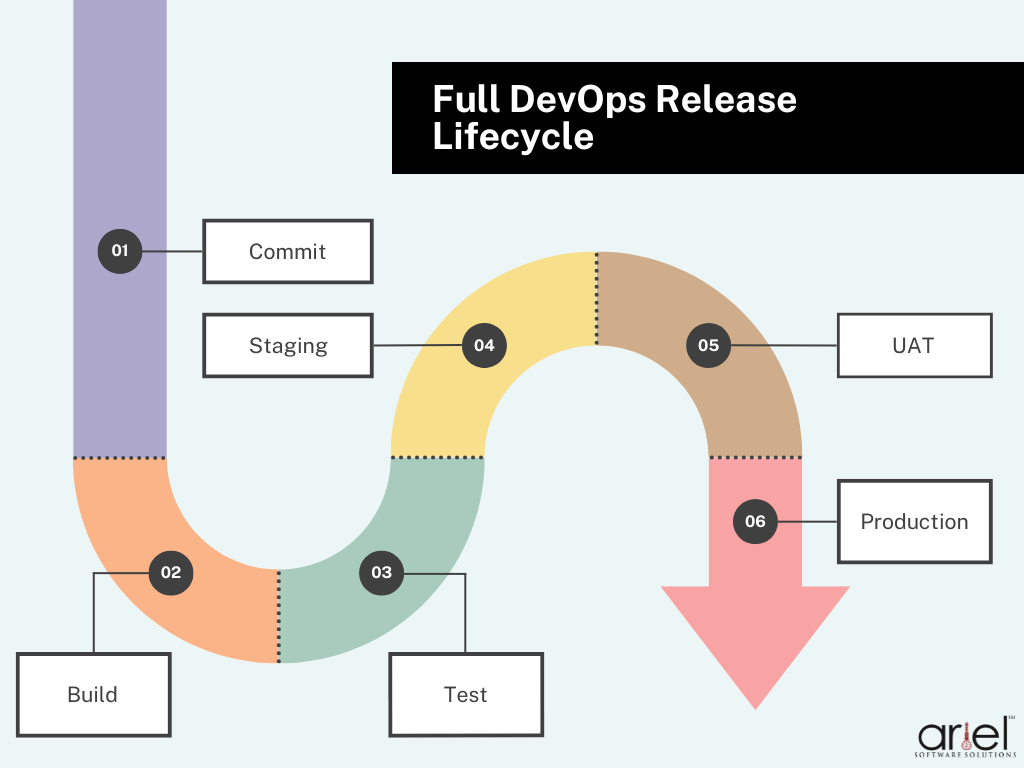
This blog post aims to answer that question. We’re mapping the complete DevOps release lifecycle, from that initial commit to your code’s final deployment. But rather than just listing tools or practices, we’ll walk you through the stages with real-world clarity, providing a visual mental model of the entire journey.
Whether you’re using Azure DevOps workflows, GitHub Actions, or a hybrid setup, understanding this full release map helps teams improve visibility, traceability, and deployment confidence.
Why the Full DevOps Lifecycle Matters
Too often, development teams treat release as an afterthought. Code gets merged, someone triggers a pipeline, and with luck, things make it to production. But as you scale, this approach breaks down.
Your team needs more than just automation; they need a release strategy. One with checkpoints, traceability, rollback options, and accountability. When developers, QA engineers, security teams, and DevOps professionals are all aligned around a shared DevOps release lifecycle, everything improves: speed, quality, and, most importantly, trust.
For teams looking to deepen their understanding of release management best practices and how Azure DevOps can specifically streamline software deployments, check out our detailed guide: “Effective Release Management Using Azure DevOps: Streamline Your Software Deployments.” This blog complements the full DevOps lifecycle by focusing on release strategies and tools that help you deliver with confidence.
Stage 1: Commit (Triggering the Journey)
The DevOps release lifecycle begins with a simple act: a developer pushes code to a shared repository. But this seemingly basic event is the foundation of everything that follows.
What Happens:
- A Git commit is made to a feature branch or the main branch.
- This commit triggers the CI/CD pipeline automatically.
Tools:
- Azure Repos, GitHub, or Bitbucket for version control
- Webhooks or CI triggers configured via Azure Pipelines or GitHub Actions
Best Practices:
- Use feature branching and pull requests to control what gets merged.
- Enforce code reviews and automated checks (e.g., linting, security scans).
- Tag every commit with metadata: issue ID, author, and commit message.
Pro Tip: In Azure DevOps workflows, you can link commits to work items, enabling full traceability from user story to production.
Stage 2: Build (Creating a Deployable Artifact)
Once the code is committed, the build stage compiles the code and packages it into deployable units. Think of this as the factory where raw materials (code) become finished goods (artifacts).
What Happens:
- The CI server picks up the code.
- Code is compiled, dependencies are installed, and unit tests are run.
- Output artifacts are stored (e.g., Docker images, JAR files, binaries).
Tools:
- Azure Pipelines, GitHub Actions, Jenkins, CircleCI
- Azure Artifacts, JFrog Artifactory, GitHub Packages
Best Practices:
- Fail fast, catch issues during the build.
- Use versioning for build artifacts (e.g., Semantic Versioning).
- Store build metadata for auditing.
Stage 3: Test (Validating for Functionality & Quality)
Testing isn’t a checkbox; it’s a critical stage where bugs are caught before they become incidents.
What Happens:
- Unit tests validate isolated components.
- Integration tests ensure systems work together.
- Static analysis tools scan for security vulnerabilities.
Tools:
- xUnit, JUnit, NUnit, Selenium, Postman, OWASP ZAP
- Test management via Azure Test Plans
Best Practices:
- Automate as much testing as possible.
- Run tests in parallel to reduce feedback time.
- Use quality gates to block the promotion of failed builds.
Note: Integrating these tests into your CI/CD pipeline helps ensure continuous quality checks throughout the DevOps release lifecycle.
Stage 4: Staging (Pre-Production Simulation)
Here, you’re simulating production as closely as possible without impacting real users.
What Happens:
- Artifacts are deployed to a staging environment that mirrors production.
- System integration, smoke, and regression testing take place.
- Performance and load testing can also occur here.
Tools:
- Azure App Service (Staging Slots)
- Infrastructure managed using Terraform, ARM, or Bicep
Best Practices:
- Use Infrastructure as Code to provision environments.
- Enforce environment parity with production.
- Run chaos engineering or failover simulations to test resilience.
Using tools like Azure DevOps workflows, you can automate environment provisioning and maintain staging consistency with production.
Stage 5: UAT (User Acceptance Testing)
This is where the business team, clients, or end-users verify whether the application meets their expectations.
What Happens:
- Selected users test key functionality.
- Feedback is collected and looped into Jira or Azure Boards.
- Only after approval can the release proceed to production.
Tools:
- Azure Boards, TestRail, Zephyr
- Automated UAT in some cases via TestCafe or Playwright
Best Practices:
- Define acceptance criteria beforehand.
- Use UAT sign-offs as formal go/no-go gates.
- Document feedback to improve future releases.
Traceability Callout: Azure DevOps workflows allow you to trace every feature from backlog → commit → UAT → production. This is invaluable for audits and builds a strong DevOps release lifecycle foundation.
Stage 6: Production (Go Live, But Controlled)
At this stage, you’re ready to deploy to real users, but how you do it matters just as much as what you deploy.
Deployment Strategies:
- Blue-Green Deployments: Minimize downtime by switching traffic between two environments.
- Canary Releases: Gradually expose features to a small percentage of users.
- Rolling Deployments: Update instances in batches, reducing impact.
Tools:
- Azure Deployment Slots, GitHub Environments, Octopus Deploy, Kubernetes Operators
- Monitoring with Azure Monitor, App Insights, Datadog
Best Practices:
- Always include a rollback plan.
- Configure deployment approvals.
- Set up alerts and dashboards to track key metrics.
Controlled deployment via CI/CD pipelines ensures that the DevOps release lifecycle doesn’t end in surprise outages or hotfixes.
| Strategy | Description | Best For | Risk Level |
|---|---|---|---|
| Blue-Green | Switch traffic between identical environments | Downtime-sensitive apps | Low |
| Canary | Release to a small % of users first | Feature validation in real-world | Medium |
| Rolling | Deploy in batches across servers | Gradual updates at scale | Medium |
Cross-Cutting Concerns Across the Pipeline
Traceability
- From work item to production: map the lineage using Azure Boards + Pipelines.
Approvals
- Enforce manual approvals at UAT and production stages to mitigate risk.
Rollbacks
- Store previous versions and deploy them using rollback scripts or container tags.
Security
- Use Azure Key Vault for secrets.
- Enable role-based access control (RBAC) across pipelines.
Compliance
- Maintain audit logs of who approved what and when.
- Use policy checks for branches and pipelines.
How Ariel Software Solutions Can Help
At Ariel Software Solutions, we specialize in delivering tailored DevOps solutions built around your workflow. Whether you’re a startup or an enterprise scaling globally, we help you map and automate the full DevOps release lifecycle.
What We Deliver:
- CI/CD pipeline design with Azure DevOps workflows or GitHub Actions
- Implementation of traceable workflows from commit to production
- Infrastructure-as-Code setup using Terraform, ARM, or Bicep
- Testing automation and secure release gates
- Full visibility into releases via dashboards and reports
Let us help you build confidence in every release, reducing human errors, improving speed, and enhancing transparency at every level.
Final Thoughts:

Releases shouldn’t feel like gambling. When you map your DevOps release lifecycle with precision, from that first commit to production, you move from chaos to control.
By implementing these stages using platforms like Azure DevOps workflows or GitHub Actions and reinforcing them with automation, approvals, and traceability, you empower your team to deliver with speed and confidence.
Looking to level up your release strategy?
Get in touch with us to build a modern, end-to-end CI/CD pipeline that’s made for scale, resilience, and high-performance delivery.